Create the Test Case
We have downloaded the required application, created a project in intaQt Studio and configured the Appium Desktop app to find XPaths from the Selendroid Test App.
1. Create an Appium Configuration File in intaQt Studio
Create an Appium configuration file by right-clicking on your project's name, which is on the left side of the window. Select New ->File. Name the file Appium.conf and enter the configuration properties:
1 2 3 4 5 6 7 8 9 10 11 12 13 | Appium { isActive = true apps = [ { name="io.selendroid.testapp", path="resources/apks/selendroid-test-app-0.10.0.apk", capabilities { appWaitActivity = "io.selendroid.testapp.HomeScreenActivity" automationName = "uiautomator2" } } ] } |
| Note |
|---|
The isActive parameter must be set to true in order to enable tests running Appium. This tells intaQt to start the Appium Server when running the test case. |
2. Create the Feature File
Create a directory called Features by again right-clicking on the project name -> Directory.
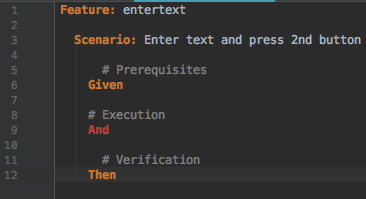
Right-click on the Features directory -> New -> Feature and name the file entertext and the Scenario Enter text and press 2nd button. A Feature File template will appear:
3. Write the Test - Get a Phone
Write a step under the # Prerequisites section that tells intaQt we need a phone:
1 | Given an Android phone as A |
4. Write the Test - Open the App
Open the app on the phone. On a second line, write the following step:
1 | And open app io.selendroid.testapp on A |
| Note |
|---|
The app name io.selendroid.testapp must match the string that we defined for the name configuration in the Appium.conf file (see above). |
5. Write the Test - Enter Text into the Input Field
Write a step that tells intaQt to type text into the app under the # Execution section:
1 | Then on A, enter "some text" into the input field |
This tells intaQt that we want to interact with phone A. You will notice that the text is red: this is because it isn't recognized by intaQt. In that case, we need to create a Stepdef for it.
6. Write the Test - Create a Stepdef
Create another directory called stepdefs by right-clicking on the folder -> New -> UI Steps.
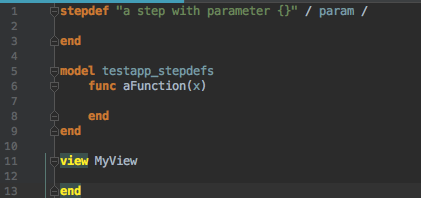
Enter testapp_stepdefs as the name. This will create a file called testapp_stepdefs.uisteps creating the following Stepdef template:
Edit the Stepdef's first line so that it matches the step we used in the Feature File:
1 2 | stepdef "enter {} into the input field" / text / end |
The Stepdef takes one parameter called text. This will allow us to specify any text that we want in the Feature File.
Return to the Feature File where you have already used the step. You will notice that though definition for this step exists, it will still be highlighted red. We need one last configuration to solve this.
Create a new empty file in the project root directory called Glue.conf and paste the following in it:
1 2 3 | Glue { path = ["stepdefs"] } |
This configuration tells intaQt to look in the stepdefs directory to find our custom Stepdefs.
Return to the Feature File and the step is now white.
7. Write the Test - Create the View
Write a View to select the Selendroid Test App's input field under your Stepdef:
1 2 3 | view InputFieldView elem inputField := "//*[@resource-id='io.selendroid.testapp:id/my_text_field']" end |
This View contains the following:
-
View named:
InputFieldView. -
UI element in the
InputFieldViewindicated by the keywordelemand assigned the nameinputField. -
A
:=is written next toinputField, followed by its XPath address, which we found using the Appium Desktop App.
| Note |
|---|
| The best practice is to make a screenshot of the phone's screen showing the screen with the elements you have described in the View: |
* Save this screenshot in a file that has the same name as the View (here it would be InputFiledView.png). |
* It is easy to understand the code later if you have an image of how the phone's screen looks that you can compare against the XPaths described in your .uisteps files. |
| * The screenshot can be taken directly from the Appium Desktop App window. Crop it to the phone's screen. |
| Important! |
|---|
The double quotes ("") within the XPath must be replaced with single quotes ('') as shown above, while the entire XPath is enclosed in double quotes. |
8. Write the Test - Use the Stepdef to Address the View
Add a line that allows our Stepdef to wait for the View to appear:
1 2 3 | stepdef "enter {} into the input field" / text / await InputFieldView end |
This only makes the Stepdef wait for the View, but it does not yet interact with it.
Add a line to InputFieldView and expand the View to the following:
1 2 3 4 | view InputFieldView elem inputField := "//*[@resource-id='io.selendroid.testapp:id/my_text_field']" action (inputField) enterText := type end |
This new line defines an Action towards the inputField:
-
Actions are indicated by an
actionkeyword. -
Next to the
actionkeyword, specify the element that we want to address within brackets:(inputField). This tells intaQt that the Action we define will interact with that element. -
We have named the Action
enterText. -
A
:=is written next toenterTextfollowed bytype, which is one of the Built-in Actions that you can use in UI Steps.
| Note |
|---|
To see a list of supported Actions, suggestions for Action types, type CTRL-SPACE. |
9. Write the Test - Modify the Stepdef
Revise your Stepdef to the following:
1 2 3 4 | stepdef "enter {} into the input field" / text / v := await InputFieldView v.enterText(text) end |
Assign the View to a variable, v:
-
The View found by the
awaitstatement will be written into this variable. -
On the next line, we perform the Action we defined,
enterTexton the View. -
This action takes a single parameter,
(text), which we specified in the first row of the Stepdef.
10. Close Appium Desktop App
| Important! |
|---|
| Before proceeding to the next step, make sure that you have closed the Appium Desktop App. Otherwise, you will have two Appium Servers running at the same time (in the Desktop App and by intaQt Studio), which can interfere with test case execution. |
End the Appium Desktop session, then click the || sign in the black log output window's upper right corner.
Click the X and close everything until you see the Start Server button that appears after launching Appium Desktop.
11. Run the Feature File
Return to your Feature File in intaQt Studio after closing the Appium Desktop app.
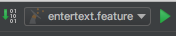
Click the green Run button located on the top right side of the window:
Right-click on the Feature File and select Run 'entertext.feature' and it should return the following:
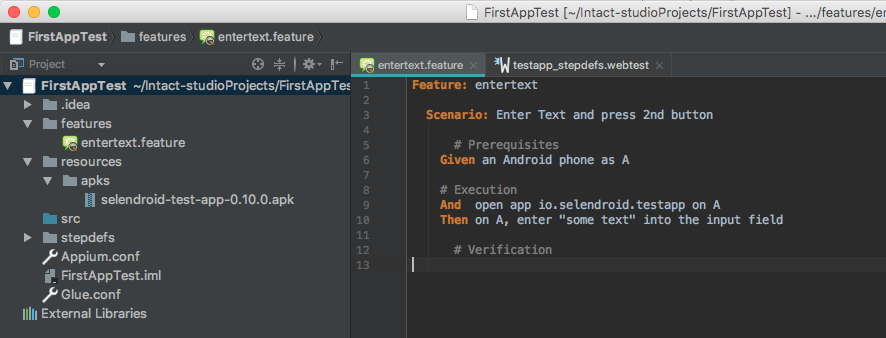
The Selendroid Test App will now launch on your phone and "some text" will be entered into the field as the text is being executed.
12. Write the Feature File - Add the "Press Button" Step
Update your Feature File so that it adds a button-pressing action as well as a wait statement:
1 2 3 4 5 6 7 8 9 10 11 12 13 14 | Feature: entertext Scenario: Enter Text and press 2nd button # Prerequisites Given an Android phone as A And open app io.selendroid.testapp on A # Execution Then on A, enter "some text" into the input field And on A, press the second button # Verification And wait for 5 seconds |
Update the View so that it contains the additional element (the second button in the Selendroid App) and the Action performed on it (a click).
Create a new Stepdef that defines the press the second button step from the Feature File and links it to the View.
| Note |
|---|
| You will need to return to the Appium Desktop app to find the button's XPath. Remember to close Appium before executing your updated test case. |
13. Troubleshooting
If you find an issue or face trouble finding the correct XPath, refer to the Stepdef example below:
1 2 3 4 5 6 7 8 9 10 11 12 13 14 15 16 | stepdef "enter {} into the input field" / text / v := await InputFieldView v.enterText(text) end stepdef "press the second button" v := await InputFieldView v.pressButton() end view InputFieldView elem inputField := "//*[@resource-id='io.selendroid.testapp:id/my_text_field']" elem button := "//android.widget.Button[2]" action (inputField) enterText := type action (button) pressButton := click end |
Conclusion
This tutorial has introduced you to intaQt's Apptest, where we created a test case that first enters text into the Selendroid Test App and then presses a button.
We demonstrated how to set up a project with a recommended directory structure, illustrated the Appium Desktop app's features that help you locate an application's XPaths. Using the XPaths, we then constructed our test cases in intaQt Studio using the UI Steps language to describe the Views and by writing a Feature File to execute the steps.
If you would like to create an Apptest using a different app, this tutorial's Appendix explains how to download other apps and get their APK onto your computer. Additionally, the intaQt manual's UI Steps Language, UI Steps and Apptest chapter contains further reference material to help construct Views.