Set Environment Variables
The ANROID_HOME and JAVA_HOME variables must be set to use many of intaQt's features. The following platform-specific instructions explain how to:
-
Set the
ANDROID_HOMEvariable to the location where QiTASC Cockpit has installed Android SDK. -
Set the
JAVA_HOMEenvironment variable to the location where QiTASC Cockpit has installed Java JDK. -
Add paths to the
PATHvariable so that your system can find the executables forjavaandadb.
| Important! |
|---|
| These instructions assume that you have installed Android SDK and Java via the QiTASC Cockpit and have them installed in the default locations (in other words, the location that the QiTASC selects by default). |
1. Set the Environment Variables - Windows Users
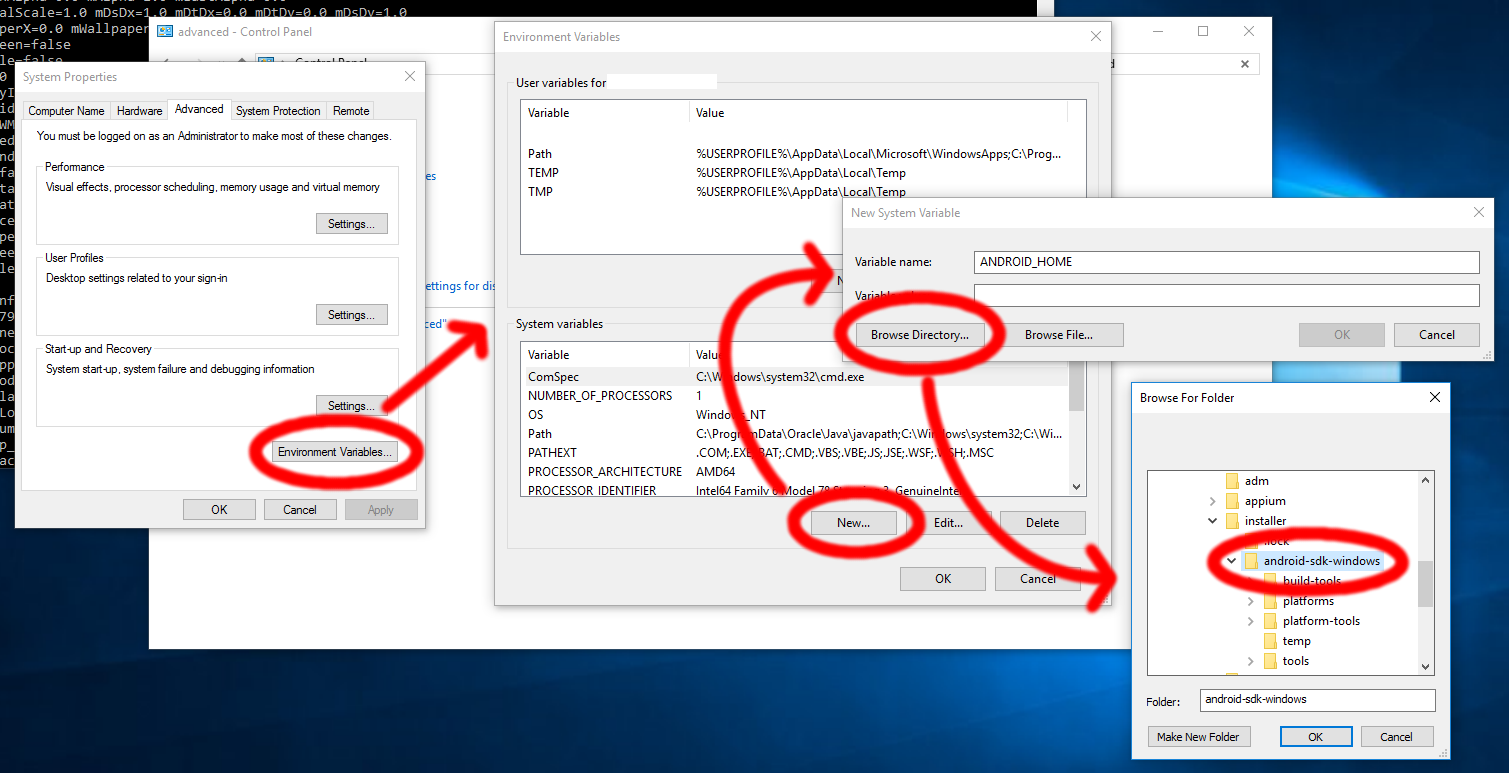
Set the ANDROID_HOME path for Android SDK, by:
-
Opening the Control Panel ->
View Advanced System Settings. -
Selecting Environment Variables button ->
System Variables->New...and enterANDROID_HOME. -
Click
Browse Directory...to find the location where SDK is installed.- If you have used the QiTASC Cockpit's default values, the path is
C:\QiTASC\installer\android-sdk-windows.
- If you have used the QiTASC Cockpit's default values, the path is
Repeat these steps for ANDROID_HOME, but select the directory where you have installed your Java JRE or JDK.
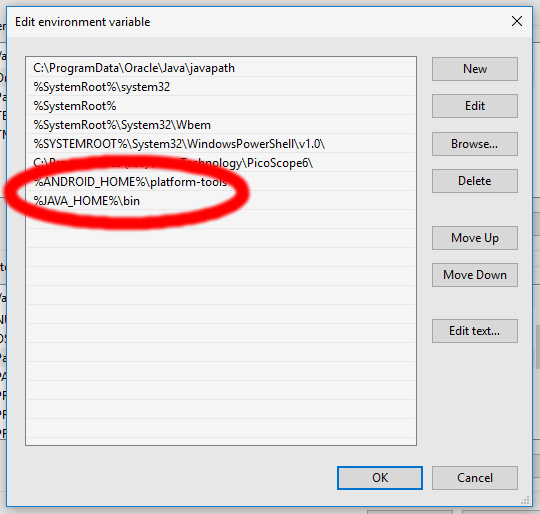
Adding two paths to the ANDROID_HOME and JAVA_HOME environment variables is mandatory. This can be done by editing each of them to include a path to the adb and java executables:
-
ANDROID_HOME- Add the location whereadbis installed. By default, this should be in theplatform-toolsfolder, which is a subfolder of the Android SDK folder. For example,ANDROID_HOME\platform-tools. -
JAVA_HOME- Add the location where thejavaexecutable is installed. By default, this should be in thebindirectory underJAVA_HOME. For example,JAVA_HOME\bin.
Test your settings by opening a command prompt and type java -version and adb:
2. Set the Environment Variables - Mac OS
Open a new session in command line and enter the following:
1 2 | touch .bash_profile open .bash_profile |
A text editor will open, which may either be empty or will contain preferences and environment variables. Leave this editor open: you will need to paste the locations of your Java and Android SDK there.
| Note |
|---|
| Make sure that you have the following ready to paste into the text editor: |
| * the path to your Java |
| * the path to your Android SDK platform-tools |
3. Set JAVA_HOME
Return to the commnand line and enter which java. The response should be /usr/bin/java. Next, find out the Java version by entering java -version.
Return to the text editor and enter the following:
1 2 | export JAVA_HOME=$(/usr/libexec/java_home -v 1.8.0_66) ## 1.8.0_66 is the Java version. If you are using a different Java version, enter ## that number instead. |
Save the file and return to the command line .
Confirm that JAVA_HOME is set by entering:
1 | echo $JAVA_HOME |
Entering the above, will produce an output that looks similar to:
1 | /Library/Java/JavaVirtualMachines/jdk1.8.0_66.jdk/Contents/Home |
4. Set ANDROID_HOME
Find the path to your Android SDK, which was installed from the QiTASC Cockpit. By default, it is installed at: Users/yourUserName/QiTASC/installer/android-sdk-macosx/.
Copy the path, then enter the following into the the text editor, below the JAVA_PATH line:
1 | export ANDROID_HOME=<AndroidPath> |
Replace the <AndroidPath> with your path:
1 | export ANDROID_HOME=/Users/YourName/QiTASC/installer/android-sdk-macosx |
Save the file and return to the command line.
5. Set PATH Variable
Set the PATH variable by pasting the following into the text editor window:
1 | export PATH=$ANDROID_HOME/platform-tools:$PATH |
Once again, save the profile and close it.